Virtual Network Computing
Virtual Network Computing or VNC allows a user to gain access to a computer through an established network. At Knox, users can use the campus network to access their computers from any computer on campus using VNC software.
Contents
Risks[edit]
By setting up a VNC client, you are allowing intimate access to your computer. You can set a level of protection for yourself by setting a password, but that password is all that is keeping someone on campus from being able to use your computer. So, consider yourself warned.
Subnets[edit]
See main article at subnet.
Using VNC software on campus is slightly complicated because the school network is split into subnets. Student subnets are typically divided based on residence.
In order to access a computer that is on a different subnet, you must first access a central computer called "Leibniz". This is a Linux machine that sits outside the subnet system.
Knox users can access this computer by using ssh and logging in with their Knox user names and passwords. Once in, the user may create a VNC server on their virtual machine which can be accessed by a VNC viewing client.
Once accessed by a VNC viewer client, the user may open another VNC viewer and gain access to the remote computer.
Quick and easy guide[edit]
For Windows users[edit]
- Install the VNC server on your computer. You can get it off NAS \\nas\pc_apps\vnc\VNC4
- Open up the VNC server (it will be in your system tray) and put in a password
- Check what you IP address is and remember that, or, since we don't use static IP's, remember what you computer name is.
For Mac users[edit]
Download VNC software[edit]
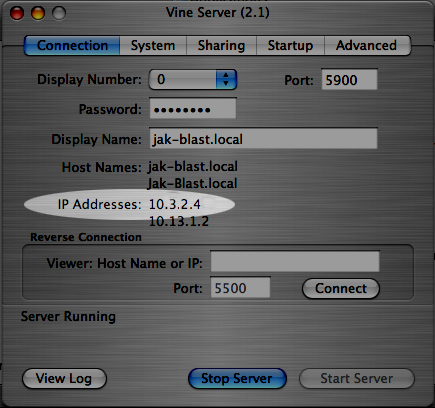
In order to access your computer from any other computer on campus, you will need a VNC server client. I would suggest Vine Server because it is free and easy to use. Once it is installed, run the application. It might be a good idea to put the application in your startup items list so that it is always running.
Note your IP address (example circled below). You may also enter a password if you wish to protect your computer. See Risks section below.
Establish Leibniz server[edit]
- Open Terminal (Applications/Utilities/Terminal.app).
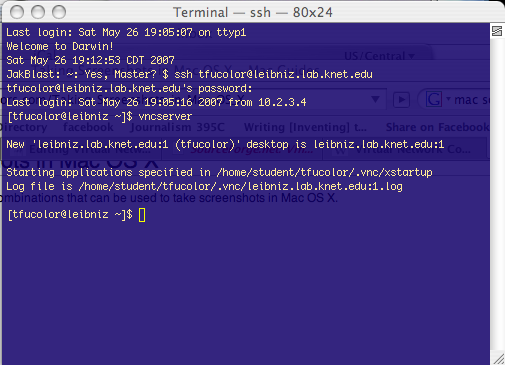
- Type: ssh username@leibniz.lab.knet.edu and enter your e-mail password when prompted
- Type: vncserver
- Note the port number, which looks like :6. In the image below, my port number is :1
If VNC server (Vine Server) is running on your Mac, then you are ready to access it from any computer on campus, including Windows machines.
Accessing your computer[edit]
- Once you have gone through the stages described above, your computer is ready to be accessed. The Windows machines in the computer labs have a program called Real VNC installed (Start-Programs-Real VNC). Run it.
- Type: username@leibniz:6 (the :6 is the port number you noted earlier.)
- Enter your password when prompted.
- You will now see your virtual desktop on Leibniz.
- In the terminal, type: vncviewer
- Enter your IP address (which you noted earlier. Looks something like 10.3.2.4).
- If you are prompted for a password, enter the password you used for the VNC server client on your computer (REAL VNC for Windows or Vine Server for Mac).
And there you are.
Alternate Method[edit]
This method may be faster and it skips you visually going through your Leibniz desktop.
- Open Putty (\\nas\pc_apps\putty\putty.exe)
- Enter "leibniz.lab.knet.edu" for the host name. I think just "leibniz" will work too.
- Click on "tunnels" at the bottom of the left hand pane.
- Enter "5900" for the source port
- Enter "yourcomputername:5900" (Ex:founders1:5900)
- Click "Add."
- Enter your username into the command line screen that pops up
- Enter your password. I forget whether it's your Knox email password or your original VNC password that you set up on Leibniz. I think it's the Knox one.
- Open the RealVNC Viewer
- Put in "localhost"
- Enter your VNC password
- Don't close the Putty window until you're done.

